Monday, January 30, 2012

Ruffles have Pleats, not Gathers

I hate gathering.  The thread always breaks halfway through the gathering process.  It is so frustrating and I hate it.

I made a dust ruffle for the crib this weekend and it called for gathers.  I debated opening my new serger box and trying out the gathering stitch, but I am so limited with time these days that I figured it would be faster to just use the method I know rather than learning a new method.  I even used a contrasting thread when I put in the gathering stitches.  

And what did that fancy purple thread decide to do?
It decided to break halfway through the gathering of the long edge of the dust ruffle.  Argh.  Did I mention that I hate gathering?

I decided to go another route...pleats.  Of course, this meant endless seam ripping, because I had been stupid enough to put the gathering stitches in ALL of the pieces instead of just one piece at a time.

To make even pleats, I took the ruffle pieces and marked out inch-long increments with a long-short-long-short method.  Very official.  And then I just folded them up...matching long notches. 
 It seemed to work.  I'm not quite sure how or why.
I used Simplicity pattern 2279.  It wasn't a perfect fit on the crib...it was a little too long.  You can kind of see it in the above photo, but it is really apparent in this next one:
Oh well.  It's still good.  I love the color against the white of the crib.  The orange fabric is from my mom.  A yard sale find -- maybe five yards for 50 cents.  And this used a lot of fabric.  
Don't mind all the stuff in the crib.  I'm using it for storage for a while...mostly to keep the cats out of it.
One box is filled with all clothes larger than six months and the other has a small selection of cloth diapers.  And then there's the tub of stuffed toys.  That could easily go on the floor, but the dog has decided that her primary goal in life is to eat that Goodnight Moon bunny.  She's also obsessed with a squeaky Sophie giraffe.  Grrrr.  Why are dog and baby toys so similar?

Saturday, January 21, 2012

Nursery Evolution: The Dresser

Meet the blue dresser:  
We got this dresser off of Craigslist for $50.00!  It is all wood, with dove-tailed joints, and it was spray-painted blue about ten years ago for a little boy's room.

I loved the color, but wanted to dress it up a bit -- maybe just do the drawers and the sides in some bright funkiness.  My first thought was to Modpodge some colorful paper onto each drawer face, sort of like this, or this, or this.  I just couldn't get the male half of the household to agree with me on this craftventure.  Argh....

Well, I could always paint it, right?  Of course we're in the middle of winter here in Minnesota (albeit one that seems pretty mild) and painting outside is a bad idea.  I still had some zero-VOC paint sample pints from picking out the wall color, so I could always use one of those with just a very quick sanding of the drawers and the sides...inside the house.  I figured that wouldn't be so bad for anyone involved, so that's what I did.  And it wasn't bad at all.  I put down cardboard and used that tacky cloth and the dust was minimal.

I went with the lightest of the three gray samples: California Elements "Covered in Platinum" and in keeping with the theme of the room, I continued the stencils onto the dresser:
As you can see, I left the top blue.  It felt a bit more durable than the gray paint and I still like the blue.   I also brought the stencils around to the sides of the dresser:
I left the original hardware, which is not the original original hardware, but the hardware that the previous owners used.  For each handle screw hole there were about three holes drilled into the wood.  I puttied over the holes on the top drawer, but did not do so with the bottom three drawers.  I really wanted to get new hardware (maybe ones in different colors?) and didn't know which holes would be best, but the male half stepped in and nixed the handle idea -- he wanted something simple that would still grow with the Kraken.  You can't really see the extra holes unless you are right on top of the dresser.  Plus I was too eager to paint it and fill it with baby girl clothes!

Thursday, January 19, 2012

Hipster Bag

I read a review of the Two Zip Hipster Bag by Erin Erickson on How About Orange that was pretty good, so I decided to make that for my friend's ten-year-old girl for Christmas.  I had been considering the messenger bag from the Oliver and S book, but it was all edged in bias binding and I didn't want to hassle with that, so when I saw the Two Zip Hipster Bag, I thought I'd give that a try.  Plus I had heard that she was getting a Kindle for Christmas and the bag was pretty much made for a Kindle, so that sold it for me.

So I ordered the .pdf file and read through the directions.  The supplies section listed that you needed a 1.5" rectangle and a 1.5" slider for the strap hardware.  No problem, right?  Well, in the notes section of the supplies, she indicated that 1.5" hardware is hard to come by and that I should shop on Etsy for it.  Um, well, that's all well and good, but I did not budget enough time before the package had to go out to wait for a package from Etsy.  I made the rounds at the sewing supply stores and I could not find the right hardware.  She also suggested getting a thrifted bag and stealing the hardware from that.  So, I went to the Goodwill, found a bag, measured the hardware, and used that.  Unfortunately, I measured the outside of the hardware and not the internal portion, so I was still off.  Oh well.

Forgive the color saturation of this first photo.  It's the only photo I have of the entire bag:
And here's a close-up and a more accurate color palette:
I figured that the mismeasurement of the hardware was pretty insignificant.  It was better for the strap to be a bit too tight than a bit too loose.  I'm still pretty annoyed with the pattern, though, because of the whole go buy it on Etsy thing.  It's not the pattern's fault that I did not have three weeks to make the bag (i.e. wait for an Etsy delivery), but still annoyed.
I lined it with some light green shiny fabric that I had leftover from my Jane Austen dress.  

As for the directions, I thought everything was pretty easy to follow and there were pictures for almost every step you take.  You have to print out about 35 pages and then you tape all the pattern pieces together.  The one thing that was a little hard at first was the bending process of the zipper ends for the top opening.  You kind of have to fold them over so that they make a nice roundish end and then you have to quickly handsew it in place.  I forgot to get my needle ready before the bending, so then I had to start all over again in order to thread the needle.  I really don't know how to explain it, but here's a close-up of the zipper just after the ends had been rounded off and tacked down:
So there you have it.  A nice little bag.  The report from her mom was positive, so I think it was the right choice!  Yay!

Wednesday, January 18, 2012

Two Aprons

I'm still trying to catch up on posting all of last month's Christmas gifts and that's where these two aprons come in.  Both of these aprons come from The Perfect Apron by Rob Merret.  There are some really cute apron ideas in this book, but I bought it after The Great Apron Surge of 2007-2008, where it felt like I was making aprons every other week, so I haven't really had a chance to make anything until now.

The first apron is called "China Doll" simply because it was inspired by a vintage tourist shirt with some dragons on the back of it.  It also has a gathered waistband and is edged in bias tape.  Anyway, I needed to make an apron as a hostess gift last month.  I chose some Alexander Henry fabric with half-naked men (similar to this fabric, but with a white background) and I paired it with some red and white woven gingham:
It came out pretty nice, but my one major complaint about the pattern instructions is that they tell you to bind the edge using the most asinine method ever.  They tell you to stick the raw edge in between the two layers of bias tape and then stitch, thereby catching both edges as you sew.  This is a lazy way to bind edges with bias tape.  Sure, it takes a lot more time to do it the right way (stitching one side, folding it over to encompass the edge, and then sewing around again), but it's worth it.  Since I was semi-short on time, I went with the book's method.  Bad idea.  I missed the edge again and again...and again.  And then there was the time spent pulling out stitches and trying to shove frayed fabric back into bias tape.  Blah!  Even after I thought I had finished it (and taken its photo), I noticed some edge sticking out:
Argh!   More re-stitching!  What a stinker.  I am vowing to never again try to cheat the bias tape system.  I just don't have the patience to redo things that many times.  But in other news...how about a gratuitous butt shot?
Ooops...covered by the bow!  Oh well...maybe next time.

For the second apron, I chose the "Safari Style" pattern.  This is a man's apron made out of fabric, grommets, bias binding, and rope.  I needed to make an apron for my friend's kid...an eight-year-old boy with super-tall genes.  He'd outgrown his little boy apron (made out of sock monkey fabric!) and needed a new one.  I decided on an adult-sized apron so that he could grow into it.

I went with this pattern, specifically, because I figured that his mom could adjust the rope neckline to fit him, if needed.  I like the red and white striped fabric, which my mom calls pillow ticking.
The only thing I did not anticipate was how much this apron looks like a giant face.  I just need to draw in some nostrils and some teeth, don't you think?

Also note that I did NOT use their method for binding the edges with bias tape.  I did it the correct way.  Stupid directions.  

Sunday, January 15, 2012

Nursery Evolution: Outlet Covers

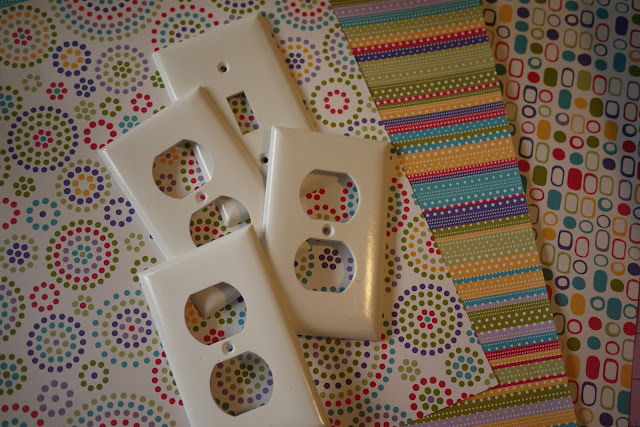
I don't remember when I decided to ModPodge the three outlet covers and the one light switch cover in the nursery, but it was the right thing to do -- I could not allow plain covers in that room!  As the stenciling got closer to completion, I knew that I had to go forward with the ModPodge plan.

I've only used ModPodge two times before...once, about ten years ago, to cover an old suitcase with all of this paper that I had accumulated after living in Japan for two years.  And the second time was probably about five years ago when I recovered a big Japanese tea box that had been banged up in my many moves.  It's pretty easy to work with and the results are always fun.

The paper that I chose for this project was in my scrapbook pile.  I can't remember where I found it, but it all came in one of those coordinating paper kits.  
At first, I couldn't choose whether or not to just do them all in the same paper or to just mix and match.   I really loved the colors in the stripes, but the circles matched the room.  And then those little funky oval-square ones were fun too.  Since I loved them all, I used them all.

I didn't take any process shots, because my fingers were sticky.  I also can't remember which tutorial I checked on youtube...probably whatever came up first in my google search.  The only thing that I wasn't sure about was what to do with the paper around the holes.  At first I bent it into the holes and modpodged the edges, but once that was dry the covers did not fit back onto the outlets, so I had to take my exacto and slice all that paper away.

Sorry, I couldn't take a picture of the one on the right from anything but an angle, because I kept casting a shadow on it.  The third outlet cover is covered in the circle dot paper, but it's behind the crib right now and I couldn't get a picture of it.  As for the light switch cover (I keep wanting to say outlet plate...is that what they're called?), I did it in circle dot paper:
I even centered the big circle around the actual flicker thing!  And don't mind that stencil underneath it.  It was one of the early ones and I tried to see how fancy I could get with the paint. It's my least favorite stencil in the room.  Ick!  (And sorry the photo is so washed out...I guess I wasn't paying attention to the camera settings in my excitement to document this achievement.) 

So what do you think?  After seeing them all completed, would you have just done one of the papers or would you have mixed them up like I did?  I really like the stripes and it really looks good against the gray wall, so maybe I should have done them all in that.  Hmmmmm...

Friday, January 13, 2012

Marker Roll-up

My next project from "Last-Minute Patchwork and Quilted Gifts" was a Christmas gift for my sister-in-law, a very talented scrapbooker.  When I saw her at Thanksgiving I asked if she used colored pencils for her scrapbooking, because I was thinking about making her the Colored Pencil Roll from the patchwork book.  Unfortunately, she said that she doesn't really use them, so I tried to think of something else for her.  But then I came across a package of 20 Stablio markers and since they were similar in size to colored pencils and they could be used for journaling, I took the plunge and made the roll-up.  But first I had to pick four additional markers to fill all 24 pockets!

The hardest part was picking 24 coordinating pieces of fabric.  The roll-up is in the 2-4 hours section of the book, but I think I spent about a whole hour in addition to that just picking out fabrics.  Otherwise, the directions were easy to follow and I got to use my walking foot for the first time ever.  (P.S.  The walking foot really looks like the star of Alien.)
I changed the order of the colors.  The book ended on purple, but I ended on green.  I think it worked as the best combo with the fabric selections.
What I also love about this project is being able to look at the fabrics that I chose and remember where else I had used them.
The book indicates that this pattern came from Pink Chalk Studio and her website has this pattern for sale in the 24-pocket roll and a 12-pocket roll. 

Thursday, January 12, 2012

Pieced Pillows


I made some pillows for a friend for Christmas this year.  They were pieced pillows and the pattern came from "Last-Minute Patchwork and Quilted Gifts" by Joelle Hoverson.  I picked up this book ages ago, probably when I first started sewing, because I was convinced that I would soon make the Color Wheel Quilt.  Well, patchwork scares me.  Sewing straight lines scares me too.  I've been trying to be a bit braver about my straight line phobia, so I actually ended up doing two projects from this book.  The first project was from page 37...Pieced Pillows.

Martha Stewart actually reprinted the how-to for these pillows on her website, so you can make them too by following these directions.  Don't listen to the few commenters on that page...the directions were not difficult and you don't need step-by-step photographic documentation in order to complete this project.  Also note that this book is divided into sections telling you how long each project will take.  The pillows are in the 2-4 hour gifts section and that was pretty accurate.  (BTW, the color wheel quilt is in the 12+ hours section.)  The only thing I modified was the closure.  The directions tell you to sew it up, but I put in a zipper instead.  What if someone vomits on the pillow?  You need to be able to wash it.  Plus I was sending this as a gift, so it was easier to send the pillow forms in a separate package straight from a retailer.  Also, I only made two pillows.
Front
And yellow on the backs.
I love this fabric.  I picked it up at a church sale in North Carolina before I could sew...maybe even back when I lived in New York, so this could have been at least seven years ago.  I had big ideas for that floral fabric.  I think I wanted to recover a chair with it at first, but never got around to that.  When I started sewing, my sewing teacher thought I should make some mod dress out of it, but she could sometimes be cuckoo-for-cocoa-puffs, so I didn't listen to her.  I almost made a maternity dress out of these two fabrics, but decided against wasting them.  And I am also currently considering using the floral as part of the maternity bag for my sister-in-law.  I have tons left.  Yay!  

Nursery Evolution: Paint

Our little Kraken will be here in late February, so after I had finished all of the Christmas sewing, I dove right into the painting of the nursery.  My major source of inspiration for the room came from this nursery.  (P.S. the source site is called Cheap and Chic, but the crib in that photo comes in at a whopping 700 plus bucks...not so cheap.) Anyway, back to the room.  I loved the dark walls with all that vibrant color, so that's what I'm working on for the Kraken.

Here is a before shot:
It's a bit of a Gloomy-Gus-Green, wouldn't you say?  In the past this room has been a lot of different colors, as evidenced by the different layers around the trim and the baseboard:  gloomy-gus-green, seafoam green, baby blue...and now dark gray.


We used California Elements Zero-VOC paint in Walrus.  It costs a gazillion dollars a gallon, but the No-VOC was important to me.  I probably could have picked up a cheaper gallon at one of the big box home improvement stores, but we went with a local supplier.  Anyway, it's a good color and it's not too dark.  I was really worried about the room being too dark.  The photo that seems to be the truest to the actual in-person experience is that middle photo above.

The next step in the paint evolution:  stencils and colors.  A few months ago Young House Love posted about stenciling their office.  It looked labor intensive, but while checking out the site from which they bought their stencil, I came across this stencil, which I call Circle Dots.  I latched onto this idea of circles and dots and just couldn't shake it.  So I bought it.  Expensive, I know, but at least I got a little bit of a YHL discount--Royal Design Studio is one of their sponsors.  Yay!

While we were buying the Walrus paint, we picked up about nine or ten little sample 2oz paint pots.  They are usually priced at $3.99, but were on sale for two bucks.  They were mostly Benjamin Moore sample pots with one California Elements pot.  There are six stencils of varying circle dot sizes, so I placed them around the room using the radiator and the high window as a sort of guide, and I would work toward the middle of each wall.  I couldn't place them all in a row, because they would overlap and I only had five stencil brushes, so I was limited in the number of colors I could use at one time.  It took about a week from start to finish.

So here are the results:
Minnesota Vikings colors for the Kraken's dad!
Final stencil placement!
I was not a stickler for keeping them all at the exact same height.  It seemed more fun to have them rolling a bit.  It was really neat to mix and match all of the colors, but it was also hard to not use the same colors really close together.  Some of my brushes didn't work as well as others and I definitely need to go back around the room for some quick touch-ups, but I love how this turned out.  It makes me very happy!

And it also gets the kitty stamp of approval:

Topsy Turvy Dolls

I don't remember when I bought Wee Wonderfuls by Hillary Lang, but it's been hanging out on my crafting bookshelf just waiting for me.  There are so many neat doll projects in it, but the one that caught my eye was the topsy turvy doll.  Do you remember these?  I think I had one as a kid -- one half of the doll was grandma and when you flipped the dress over grandma, the other half became the wolf from Little Red Riding Hood.

This summer I had big plans to make like five or six of these topsy turvy dolls and give them to all the little girls I know.  I had a whole list of recipients, most of whom were under a year old.  But given the fact that I tend to procrastinate on making almost everything, I didn't get around to my little doll assembly line that I had planned.  Oh well.  In the end, I made two dolls:  one for my sister's daughter and the other for my little four-year-old next door neighbor.

For the Wee Wonderfuls topsy-turvy doll, she's got one side that is dressed down with an apron and braids  and the other side is dressed up with a scallop-edged dress and buns.  The pattern pieces are all in the back of the book and I just had to trace them onto some lightweight interfacing in order to have my own pattern.  

For my niece:
I messed up a bit on the length of the apron, so I added the ric-rac.  The hand stitching was a bit tedious and I'm not the neatest handsewer, so the stitching is a bit uneven.
The whole process took about a week (per doll) to complete...in the evenings, while watching TV.  All the pattern pieces fit together nicely and the instructions were clear.  The only thing I didn't like was the face.  I went with the template on the first doll, but on the second one I tried something different.
I just didn't like the smallness of the features on the first doll, so I sort of just made up my own face.  First I had to draw out the doll pattern onto the muslin and then I had to sketch a face with some blue marking pen on one side of the doll.  Then I had to flip the doll and sort of assess where the other face would be and then I had to sketch another one.  Here she is all ready for embroidery:
I guess the faces turned out okay in the end.  Next time, I need to remember to snip the embroidery tails a little closer to the fabric, because once the doll is stuffed you can see the different colored threads up against the interior of the face.  Live and learn.

So here is the finished doll for my neighbor:
Oops.  One is not a giantess.  I got to see my one-year-old niece hold her doll via Skype, so when I gave this doll to my neighbor I was surprised by the fact that she actually played with it.  After I had completed these dolls, I "played" with them by just sort of pretending to walk them along in a lah-ti-dah fashion.  It's been a while since I was a kid, but isn't that how kids play??

Um, no, of course not!  The neighbor girl labeled one a dancer and the other a baker and then proceeded to move the arms about, undo the bow in the back, tug on the braids...  She actually played with the thing!  I'm not complaining.  This is good.  This is what is supposed to happen...I just hope my stitches hold up!  Do they look sturdy enough to you?
The Wee Wonderfuls topsy-turvy doll is called "Margot" in the book and can be found on page 25.